> ## Documentation Index
> Fetch the complete documentation index at: https://langchain-tutorial.mintlify.site/llms.txt
> Use this file to discover all available pages before exploring further.
# mac环境
# Mac安装入门
* 翻译:[xiaoshun007](https://github.com/xiaoshun007)
* 作者: [JeongHo Shin](https://github.com/ThePurpleCollar)
* 评审: [JeongGi Park](https://www.linkedin.com/in/jeonggipark/), [Wooseok Jeong](https://github.com/jeong-wooseok)
* 校对 : [Q0211](https://github.com/Q0211)
* 本内容是 [LangChain Open Tutorial](https://github.com/LangChain-OpenTutorial/LangChain-OpenTutorial) 的一部分
## 概述
本指南针对在Mac系统上使用LangChain进行开发,提供了一套完整的配置流程。LangChain作为基于大语言模型(LLM)的应用程序开发框架,通过本指南可确保您的开发环境获得全面优化,实现无缝集成与高效开发。
# 目录
* [概述](#概述)
* [打开终端](#打开终端)
* [安装 Homebrew](#安装-homebrew)
* [检查Xcode安装情况](#检查xcode安装情况)
* [下载练习代码](#下载练习代码)
* [Python 和环境配置](#安装-pyenv)
* [开发工具设置](#安装-visual-studio-code)
***
## 打开终端
* 按下 Command + 空格键 打开聚焦搜索。
* 搜索 **terminal** 然后按回车键打开终端。
## 安装 Homebrew
### 运行Homebrew安装命令
* 在终端中运行以下命令以安装Homebrew:
```bash theme={null}
/bin/bash -c "$(curl -fsSL https://raw.githubusercontent.com/Homebrew/install/HEAD/install.sh)"
```
* 系统提示时请输入账户密码。
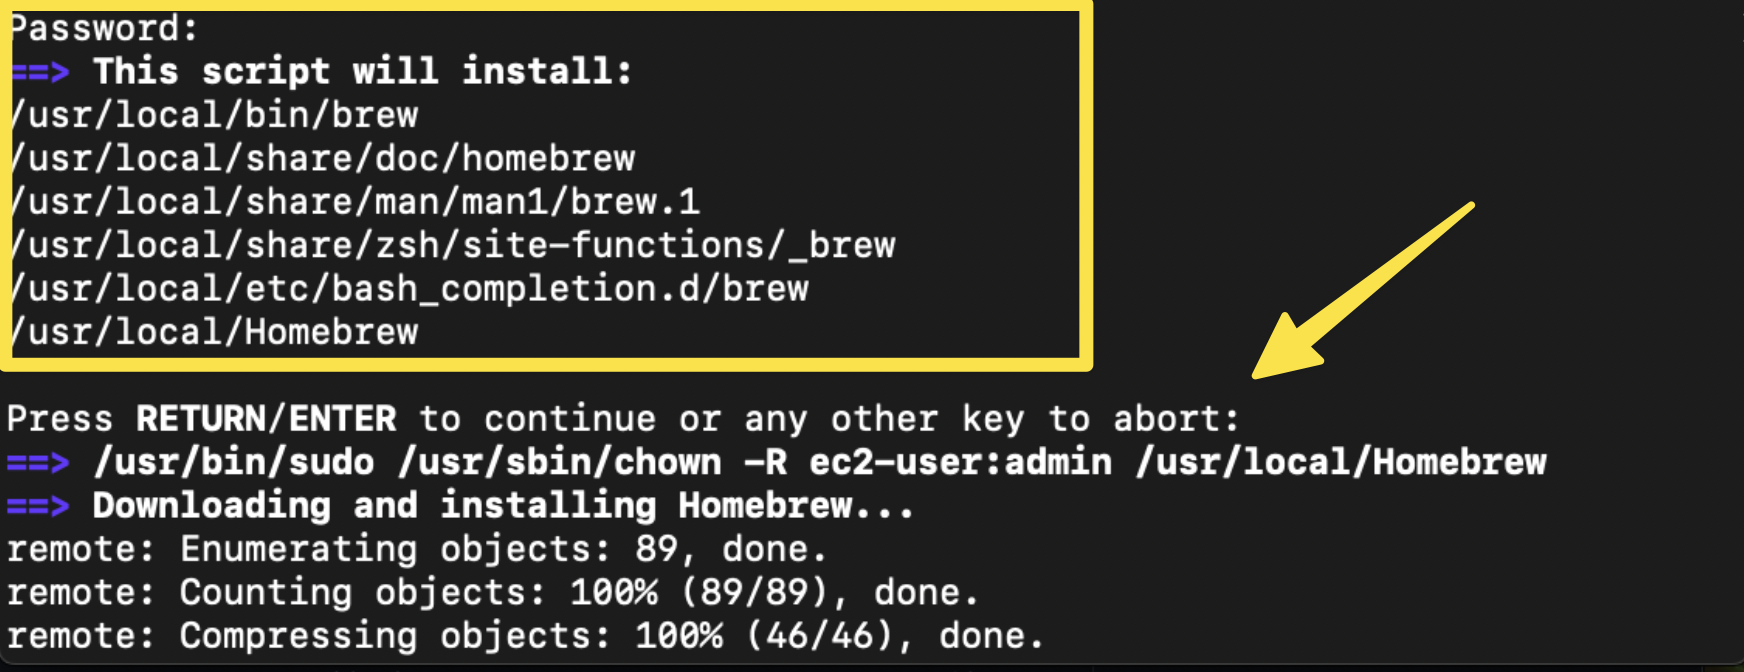 * 按回车键继续安装。
### 配置 Homebrew 环境
* 运行以下命令以检查您的用户名:
```bash theme={null}
whoami
```
* 按回车键继续安装。
### 配置 Homebrew 环境
* 运行以下命令以检查您的用户名:
```bash theme={null}
whoami
```
 * 检查Homebrew的安装路径:
```bash theme={null}
which brew
```
* 检查Homebrew的安装路径:
* **Case 1** : 若输出结果为 **/opt/homebrew/bin/brew**,请使用以下命令配置环境:
```bash theme={null}
echo 'eval "$(/opt/homebrew/bin/brew shellenv)"' >> /Users//.zprofile
```
* **Case 2** : 若输出结果为 **/usr/local/bin/brew**,请使用以下命令:
```bash theme={null}
echo 'eval "$(/usr/local/bin/brew shellenv)"' >> /Users//.zprofile
```
## 检查Xcode安装情况
要检查是否已安装Xcode命令行工具,请在终端中运行以下命令:
```bash theme={null}
xcode-select --install
```
## 下载练习代码
\[Reference] 练习代码位置: [LangChain 练习代码](https://github.com/LangChain-OpenTutorial/LangChain-OpenTutorial)
### 检查Git安装状态
* 要检查Git是否已安装,请在终端中运行以下命令:
```bash theme={null}
git --version
```
* 若命令显示Git版本号,说明已成功安装Git,无需额外操作。
* 若未检测到Git,可通过Homebrew进行安装:
```bash theme={null}
brew install git
```
* 安装完成后,请重新验证Git:
```bash theme={null}
git --version
```
### 使用Git下载练习代码
* 进入 **Documents** 文件夹(或您想要下载练习代码的其他任意目录),并使用以下命令:
```bash theme={null}
cd Documents
```
* 若需使用其他目录,请将 Documents 替换为指定路径。
* 使用 **git** 命令从代码仓库下载练习代码,请在终端中运行以下命令:
```bash theme={null}
git clone https://github.com/LangChain-OpenTutorial/LangChain-OpenTutorial.git
```
* 检查Homebrew的安装路径:
```bash theme={null}
which brew
```
* 检查Homebrew的安装路径:
* **Case 1** : 若输出结果为 **/opt/homebrew/bin/brew**,请使用以下命令配置环境:
```bash theme={null}
echo 'eval "$(/opt/homebrew/bin/brew shellenv)"' >> /Users//.zprofile
```
* **Case 2** : 若输出结果为 **/usr/local/bin/brew**,请使用以下命令:
```bash theme={null}
echo 'eval "$(/usr/local/bin/brew shellenv)"' >> /Users//.zprofile
```
## 检查Xcode安装情况
要检查是否已安装Xcode命令行工具,请在终端中运行以下命令:
```bash theme={null}
xcode-select --install
```
## 下载练习代码
\[Reference] 练习代码位置: [LangChain 练习代码](https://github.com/LangChain-OpenTutorial/LangChain-OpenTutorial)
### 检查Git安装状态
* 要检查Git是否已安装,请在终端中运行以下命令:
```bash theme={null}
git --version
```
* 若命令显示Git版本号,说明已成功安装Git,无需额外操作。
* 若未检测到Git,可通过Homebrew进行安装:
```bash theme={null}
brew install git
```
* 安装完成后,请重新验证Git:
```bash theme={null}
git --version
```
### 使用Git下载练习代码
* 进入 **Documents** 文件夹(或您想要下载练习代码的其他任意目录),并使用以下命令:
```bash theme={null}
cd Documents
```
* 若需使用其他目录,请将 Documents 替换为指定路径。
* 使用 **git** 命令从代码仓库下载练习代码,请在终端中运行以下命令:
```bash theme={null}
git clone https://github.com/LangChain-OpenTutorial/LangChain-OpenTutorial.git
```
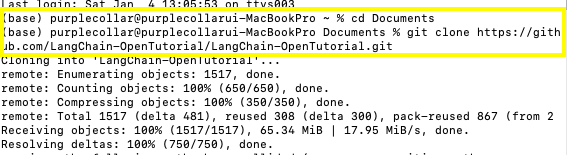 * 代码库将被克隆到当前目录下的 LangChain-OpenTutorial 文件夹中。
## 安装 Pyenv
#### 引用
详细文档请参阅 [Pyenv GitHub 页面](https://github.com/pyenv/pyenv?tab=readme-ov-file#understanding-python-version-selection).
***
#### 安装Pyenv的步骤
1. 更新Homebrew并通过以下命令安装 `pyenv`:
```bash theme={null}
brew update
brew install pyenv
```
2. 将以下内容添加到 \~/.zshrc 文件中。请将下列命令复制并粘贴到终端:
```bash theme={null}
echo 'export PYENV_ROOT="$HOME/.pyenv"' >> ~/.zshrc
echo '[[ -d $PYENV_ROOT/bin ]] && export PATH="$PYENV_ROOT/bin:$PATH"' >> ~/.zshrc
echo 'eval "$(pyenv init -)"' >> ~/.zshrc
```
3. 若遇到权限错误,请运行以下命令进行修复:
```bash theme={null}
sudo chown $USER ~/.zshrc
echo 'export PYENV_ROOT="$HOME/.pyenv"' >> ~/.zshrc
echo '[[ -d $PYENV_ROOT/bin ]] && export PATH="$PYENV_ROOT/bin:$PATH"' >> ~/.zshrc
echo 'eval "$(pyenv init -)"' >> ~/.zshrc
```
4. 重启终端以使配置生效:
```bash theme={null}
exec "$SHELL"
```
## 安装 Python
* 使用 `pyenv` 来安装 Python 3.11:
```bash theme={null}
pyenv install 3.11
```
* 将Python 3.11设置为全局默认版本:
```bash theme={null}
pyenv global 3.11
```
* 重启Shell以使更改生效:
```bash theme={null}
exec zsh
```
* 验证已安装的Python版本:
```bash theme={null}
python --version
```
* 请确认输出结果显示为 3.11。
## 安装 Poetry
#### 链接
详细文档请参阅 [Poetry 官方文档](https://python-poetry.org/docs/#installing-with-the-official-installer).
***
#### 安装与配置Poetry的步骤
* 使用 `pip3` 安装 Poetry :
```bash theme={null}
pip3 install poetry
```
* 使用Poetry创建Python虚拟环境:
```bash theme={null}
poetry shell
```
* 更新项目中的所有Python依赖:
```bash theme={null}
poetry update
```
## 安装 Visual Studio Code
* **下载 Visual Studio Code**:
* 访问 [Visual Studio Code Download Page](https://code.visualstudio.com/download)。
* Download the installer for your operating system。
* **安装 Visual Studio Code**:
* 请根据您的系统版本遵循对应安装指引。
* 将应用程序拖拽至 **应用程序** 文件夹。
* **安装 扩展**:
* 打开 Visual Studio Code。
* 点击左侧边栏上的 **扩展** 图标。
* 在扩展市场中搜索 **"python"** 并完成安装。
* 在扩展市场中搜索 **"jupyter"** 并完成安装。
* **重启 Visual Studio Code**:
* 安装扩展后,请重启Visual Studio Code以使更改生效。
* **选择Python环境**:
* 点击Visual Studio Code右上角的 **"选择内核"**
* 选择您之前设置的Python虚拟环境
* **注意**:若您的环境未出现在列表中,请重启Visual Studio Code。
***
现在,Visual Studio Code已完成全面配置,可支持Python和Jupyter的集成开发环境。
* 代码库将被克隆到当前目录下的 LangChain-OpenTutorial 文件夹中。
## 安装 Pyenv
#### 引用
详细文档请参阅 [Pyenv GitHub 页面](https://github.com/pyenv/pyenv?tab=readme-ov-file#understanding-python-version-selection).
***
#### 安装Pyenv的步骤
1. 更新Homebrew并通过以下命令安装 `pyenv`:
```bash theme={null}
brew update
brew install pyenv
```
2. 将以下内容添加到 \~/.zshrc 文件中。请将下列命令复制并粘贴到终端:
```bash theme={null}
echo 'export PYENV_ROOT="$HOME/.pyenv"' >> ~/.zshrc
echo '[[ -d $PYENV_ROOT/bin ]] && export PATH="$PYENV_ROOT/bin:$PATH"' >> ~/.zshrc
echo 'eval "$(pyenv init -)"' >> ~/.zshrc
```
3. 若遇到权限错误,请运行以下命令进行修复:
```bash theme={null}
sudo chown $USER ~/.zshrc
echo 'export PYENV_ROOT="$HOME/.pyenv"' >> ~/.zshrc
echo '[[ -d $PYENV_ROOT/bin ]] && export PATH="$PYENV_ROOT/bin:$PATH"' >> ~/.zshrc
echo 'eval "$(pyenv init -)"' >> ~/.zshrc
```
4. 重启终端以使配置生效:
```bash theme={null}
exec "$SHELL"
```
## 安装 Python
* 使用 `pyenv` 来安装 Python 3.11:
```bash theme={null}
pyenv install 3.11
```
* 将Python 3.11设置为全局默认版本:
```bash theme={null}
pyenv global 3.11
```
* 重启Shell以使更改生效:
```bash theme={null}
exec zsh
```
* 验证已安装的Python版本:
```bash theme={null}
python --version
```
* 请确认输出结果显示为 3.11。
## 安装 Poetry
#### 链接
详细文档请参阅 [Poetry 官方文档](https://python-poetry.org/docs/#installing-with-the-official-installer).
***
#### 安装与配置Poetry的步骤
* 使用 `pip3` 安装 Poetry :
```bash theme={null}
pip3 install poetry
```
* 使用Poetry创建Python虚拟环境:
```bash theme={null}
poetry shell
```
* 更新项目中的所有Python依赖:
```bash theme={null}
poetry update
```
## 安装 Visual Studio Code
* **下载 Visual Studio Code**:
* 访问 [Visual Studio Code Download Page](https://code.visualstudio.com/download)。
* Download the installer for your operating system。
* **安装 Visual Studio Code**:
* 请根据您的系统版本遵循对应安装指引。
* 将应用程序拖拽至 **应用程序** 文件夹。
* **安装 扩展**:
* 打开 Visual Studio Code。
* 点击左侧边栏上的 **扩展** 图标。
* 在扩展市场中搜索 **"python"** 并完成安装。
* 在扩展市场中搜索 **"jupyter"** 并完成安装。
* **重启 Visual Studio Code**:
* 安装扩展后,请重启Visual Studio Code以使更改生效。
* **选择Python环境**:
* 点击Visual Studio Code右上角的 **"选择内核"**
* 选择您之前设置的Python虚拟环境
* **注意**:若您的环境未出现在列表中,请重启Visual Studio Code。
***
现在,Visual Studio Code已完成全面配置,可支持Python和Jupyter的集成开发环境。